Getting Started
Getting Started
Let’s get started with storybrew! This guide is a more beginners’ friendly approach with getting started in storybrew. If you’re already familiar with programming concepts and quickly navigating the interface, you can probably get started much faster by reading the storybrew wiki instead. Alternatively, you can pretty much skim through the ramblings here, right? ;)
Installation Mania
Begin by downloading the latest version of storybrew. From there, you’d need a text editor that you can edit scripts with while deveoping in storybrew. storybrew primarily supports Visual Studio Code, a lightweight text editor suited for editing small-scale projects and scripts such as this while offering tons of convenience features. More information about VS Code can be read here.
When you’re installing VS Code, be sure to either check “Add to PATH”, or install it in the default location. This is so storybrew can find it.
Attention
storybrew relies completely on the OpenGL graphics library OpenTK. Because of this, it may have trouble running if your computer uses integrated graphics such as older versions of Intel HD Graphics.
- If storybrew is unable to run or displays like the following figure, check to see if your graphics drivers can be updated, or supports at least OpenGL 2.0 without any hitches.
- Otherwise, consider one of the other options available, or get a better computer or discrete graphics (i.e. an external graphics card).

Older computers or internal graphics computers may be unable to run storybrew.
Drawing an Owl

Hooray! Rejoice!
If everything goes well, you should be greeted with this minimalistic title screen. Select New Project and a beatmap difficulty to attach this towards. After selecting your map and project name, you’ll be directed to the main interface, which currently only has a solid black screen and nothing much going for it.
That’s fine. Because it’s time for us to go for it. ;)
Creating a New Effect
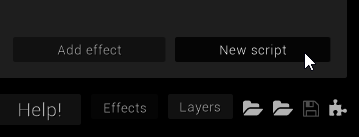
The first demo we’ll do is to create an effect. In storybrew, storyboards are made up of multiple effects, all collected together to make something coherent and exciting. As such, click on the Effects button, then select New script, as shown in the figure. Name your new script whatever you’d like (though best start with a letter and keep it one word). SampleEffect will do just fine, for instance.
In case you were lost. ;)
If everything is working so far, VS Code should open with a pre-made SampleEffect script. If this is the first time opening VS Code, it will ask if you want to install the C# extension. This is a good idea. After installing, you should reload VS Code.
Hint
If it doesn’t show up, you can press Ctrl+P, type ext install csharp, then install the “C# for Visual Studio Code” extension.
Note
The C# extension requires the .NET development library of at least 4.5. If you reload VS Code after installing the extension and encounter an error related to Omnisharp, then most likely you do not have this. Read this page and download the latest development pack. After installing the .NET framework library, restart VS Code.
If that doesn’t work, you may need to download the installer for Microsoft’s full code editor, Visual Studio, and do an advanced installation where you install only the aforementioned developer packs. It’s a huge installation otherwise.
Your window should now look something like this. Pay attention to the fact there’s now fancy colors, or syntax highlighting:

In case you were lost. ;)
Generating
The Generate method is the main body of your script. storybrew looks for this Generate method and goes, “I’m going to execute whatever’s in there”. As an example, we’re going to play with the beatmap’s background real quickly just to see if everything works.
Add the following code for your Generate method:
1 2 3 4 5 6 7 8 | public override void Generate()
{
var layer = GetLayer("MySampleEffect");
var bg = layer.CreateSprite("bg.png", OsbOrigin.Centre);
bg.Scale(0, 480.0 / 1080);
bg.Fade(0, 2000, 0, 1);
bg.Fade(8000, 10000, 1, 0);
}
|
Be sure to replace "bg.png" with whatever your background filename is for your beatmap, and then replace the 1080 in Line 5 with your background’s height dimensions if it’s not 1080. Also be sure to keep the decimal point in the 480.0, or else the calculations won’t work properly. If these commands don’t make any sense to you, consider reading storyboarding by scripting again.

Congratulations! You’ve successfully created your first effect!
If everything works, then your effect should execute cleanly, with a fade in from 0ms to 2000ms, then a fade out from 8000ms to 10000ms. Now that we created our own custom script, let’s check out one of the bundled ones to see what effects they can do.
The Rest of the Owl
Sprites
The first thing we’d need to do is to add a sprite into our mapset folder. If you don’t want to spend a considerable amount of time looking for a sprite, here’s a sample one for you to use:

Isn’t she adorable? ;)
Why not, right? In your storybrew main editor, select the second folder icon that says, “Open mapset folder”, and save your image in there. We’re going to call it hifumi.png. You can save it inside a subfolder like SB, but be sure to properly reflect that later.
Particles!
One of the most enjoyable features with storybrew are the flexibility of the generators that have been ported into the program, such as the particle generation effect. Let’s check that out! Open the effects menu again, but this time select Add effect. From the menu, select Particles.

This configuration window should pop up as you create the new effect.
We now have a brand-new particles effect applied on our storyboard, but the default configuration doesn’t leave us with any visual splendor. What you want to do next is to edit these fields with whatever you’d like. Mainly what to pay attention to is the “Path” section. We want to replace that with hifumi.png, or SB/hifumi.png if you saved that sprite inside a subfolder named SB inside your mapset folder. From there, change the EndTime to a value like 10000. Feel free to tinker around with any additional settings.
After messing around with settings, you could have a result that looks like this:

Boing boing!
If you want to change how the particles drop, you can change the values in Random seed to some other arbitrary value! At this point, you can just play around and have fun.
Congratulations! You’ve officially got started with storybrew! Was drawing the rest of the owl that tough? You can continue on to read about storybrew’s interface, or get started on learning C# programming with storybrew!